Friday, November 17, 2017

I'm now Retired - So let's Work

With the plug now pulled on my working life, it is time to start on the rest of my working life - my modelling work.  Now, continuing on with the dioramas I've been working on, the other week I did some more with them and laid cork on the two small modules.

First up it was out with the Surform to rasp off any glue or crap that was on the area where the cork was to go - the flatter the better.


The I got out the cheap version of Liquid Nails, the Maxi-Nails from Parfix. A thin bead was laid down, then smeared out with my trusty paint scrapper. The cork was then laid into place and squashed down nice and flat using the Seam Roller.


Next I got out some grey paint, I think a primer of some type, and gave the cork a lick of it to seal it a bit. I know, not necessary, but I like to seal it as it will allow me to get the track off easier should I ever want to in the future.


And that was it for a very slack day indeed. But I talked a lot of crap with the boys at the club and drank lots of coffee, so all in all it was a great day... Not having to go to work ever again, didn't hurt either !

Last Saturday, besides drinking lots of coffee and yakking with the boys (I do this a lot if you hadn't already guessed) I got out the Dremel moto-tool and hacked into the modules. I needed to carve the two larger ones so that there is a drainage ditch down either side of the track. So a sanding drum was mounted to the tool and a pile of small foam beads and dust was created so that my ditches were as I wanted. 


I couldn't carve drainage ditches on the small modules as the cork was directly laid onto the ply baseboards, but as I am making them out of the way branch lines with the track almost laying on the natural ground, the cork will suffice for enough elevation above the surrounding ground level. OK, it would be hard work and I'm a slacker, that's why. But I still like my branch line excuse.

Once I had finished making a foamy mess around the place, I decided to add some highlights to the cuts and crevices in case they show through the dirt later one. Some water based colours of slate grey and a light grey were made up into a watery wash and painted into the crevices on three of the modules - one is a rolling hill type so didn't need it.


So that brings us up to Wednesday of this week. So I continued on the modules by first sealing the drainage ditches with a lick of gap filler, colour and water. This just makes sure that when/if I use any foam eating glues or such while doing the drain scenery, that the foam is protected. You could also use a mix of white glue, colour and water, but I wanted a bit of texture and gap filling qualities, hence my gap filler mix. I mixed up the three ingredients nice and sloppy and brushed it only fairly thinly.


Now for some more mess all over the place - dirt. It was time to put some earth all over the modules so that the grass can grow later on. I used my own home made dirts that I had sifted a while back. 


I had a dirt from the creek out back (dirt coloured of course), a dark red, a light red and a slate as well. I mixed up a batch of glue by getting normal 'ol white glue (Aquadhere indoors PVA wood glue) and water and mixing it up about equal parts. This is pretty much the magic percentage for the scenery glue I use on all things from dirt to grass and ballast etc. There are a few drops of dish washing liquid in there as well to help break the surface tension.


In between doing halves of each module, I plonked them outside to soak up that lovely Queensland sunshine and mild breeze. It sure dried them fast. So now all the modules are up to the same level of completion, ie plowed.


Here is my workbench at the club at the end of my mess making and before my last cuppa before heading home to read train mags and maybe a cold one or two - I deserve it I reckon, as this retirement thing sure is very hard work !


Saturday, October 21, 2017

Rainy Day - Let's Continue

Saturday dawns and it's rainy. Feel like rolling over in bed and staying under the covers and listening to the pitter patter on the awning of the drops of rain. But, I have things to do, people to see.

So read the news, drink my coffee and off to the model train club, the RMCQ, and chat with the boys and continue with my modules.

I decided I would finish the gooping of the modules today. First up I added a few more gullies and such and did a little more rasping of the modules. Then I mixed up another batch of Vermiculite, Gap Filler and Acrylic Paint.


The two small modules then got a good going over to give them the final shape I wanted with the goop. 


The larger Extruded foam module was the correct shape already and needed no touchup today with goop. So it was over to the blue Expanded foam module for a bit of a job as the foam beads were showing through quite badly as I'd done a poor job of rasping the other day. So I applied the goop with my artists spatula and really squeezed the goop down and got a pretty good smooth surface out of it. Here is before a good squishing:


And here it is after a good squishing of the goop into all the hollows and bead holes.


After all the goop was applied, the Expanded foam module looked like this:


So since no goop was required on the large Extruded module, it was time to add the track cork to it. I have decided this will be a dual track N scale module, so that meant a spacing of about two and one quarter inches between centres for the two tracks. Marks were made and then I  got out the 30 mm Seam Roller for pressing the cork down with, the Parfix Maxi Nails and Cork.

I cut the cork about 2/3 the way through every 20 mm or so to allow it to easily bend along the curve. You'll never see the cuts as the ballast will cover them all. I then put a bead of glue all along the cork and smoothed it out with a paint scrapper. Flipping it over and positioning it made it almost done. Then with the roller to smooth it all out and make sure no air pockets and bumps, it was down.


For the last bit of work today I mixed up the "other" goop - the goop without Vermiculite. This time I made it a bit thicker - about 1/3 water, 2/3 Gap Filler and a bit of kiddies acrylic paint. This I painted over all three modules I had Vermiculited today.


All tools were then washed up and put away and more gasbagging done before heading home in the arvo for a bit to eat and relax doing... whatever came to mind. Adiós.

Wednesday, October 18, 2017

Back to it !

So after the great Sunday modelling event, Model Railways for a Day convention, Scooter and I thought we'd complete a couple of the spare left over diorama modules. Scooter grabbed his and I'll play with the remaining two. So today I took them down to the club and started.

All I have done today on these two small modules is to carve them up with a box cutter knife a bit and glue a couple of small bits in place and a quick rasp over with my Surform tools. More on Saturday I think. Here are the before shots of the two small modules:


And here are the after shots from today of the small modules:


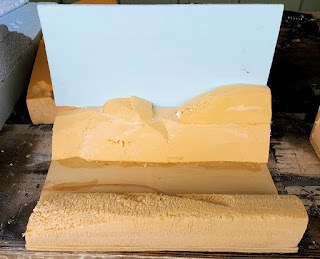
I will also fully complete the two large foam modules I used to show both Extruded foam and Expanded foam to the punters last Sunday. The Extruded foam is the yellow one here and the blue foam is the Expanded type. I have decided that the yellow Extruded foam module will be for a dual track mainline N Scale scene and the blue Expanded foam module will be a single track HO Scale line.

So the first of these modules worked on today was the Extruded foam one. Out with a box cutter and I shaped it up a lot as well as hoeing into it with the 150 mm and the 65 mm Surform tools. This gave me the rough shape I wanted. Here is the before and after shaping shots.


A quick check that 2 N scale tracks will fit properly in the right of way showed I was ready for the next step - putting up the gaps and making a few mounds to add to the shape of the hills. 


I mixed up my usual Vermiculite and Gap Filler mix with just enough brown kiddies acrylic paint for colour - Burnt Umber. 


With the help of  a paint scraper and my trusty artists spatula, the goop went into place and completed the hills nicely in my view. The module was then put aside for a while while I got into the Expanded foam module.


First up I used my rasps to shape the hills on this Expanded blue foam module to the way I wanted them. It is much easier shaping this Expanded foam compared to the Extruded which is a much tougher type of foam. 


So once the shape was right I then got out some cork for the base of the track and glued it down with Liquid Nails.


The Vermiculite goop was still viable, so a touch of water to keep it at the right texture and a pile of it got put to good use on this blue module. I didn't need too much patching, just enough to cover up any visible joins between sheets of foam and to add a smooth patch here and there as well as some small mounds. Filleting in the hills to the flats was also done.


With all the Vermiculite goop used up it was time to make another goop mix for use on both modules. This time it was the same mix but without any Vermiculite added. This will seal the foam yet leave a rubbery type film over it all that keeps it all together and can be modified with a knife later on if needed.


So in the end we have sealed modules in both cases, which were put aside to be worked on another day when they have dried - maybe Saturday I might be inclined to do some more work in between drinking coffee and gas-bagging with the fellas at the club..


Auf Wiedersehen.