Monday, August 8, 2016

Let there be Light(s)

So building on my previous article on testing of LED strips and their light output and such, I finally ordered another few sets of the best one in Cool White as well as few sets of the same LEDs in Warm White.

Upon arrival, I found that time does not stand still and the new ones were now of a type 5730 whereas the old ones were 5630.  Close enough I reckon. So into my shed I went and setup my test rig to measure the amps, volts and lux for the strips.


If you are comparing the measurements with my last ones, you will note I have adjusted to give it per metre rather than per 50 centimetre. It makes it easier when working out how much I need to buy to cover say a 6 metre layout or such.

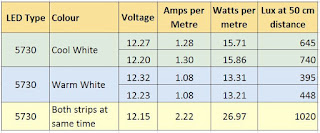
So I did two measurements of the Cool White LED strips.


Then I did two measurements of the Warm White LED strips.


I then fired up both strips side by side. So here is a strip of Cool White towards us and the Warm White away from us.


And here are the results. So the Cool White is definitely the go for producing the most light for each watt of power you supply it. The Warm white is not as efficient, as the LEDs are actually coloured somehow and this tint reduces the light output.


BUT, the Warm White does have a place. I do think I may very well use a strip of each for my lighting so that at times I can turn off the Cool White and be left with quite a nice warm light that would reflect an early morning or late afternoon glow for the layout. I wouldn't just use only the Warm White all the time - definitely need the brighter and whiter light form the Cool White.

The Cool White LEDs are at the top and the Warm White LEDs at the bottom.


Wednesday, August 3, 2016

We've Been Workin' on the Railroad

So a few updates from the last few weeks. While Dave and Kev and Phil have been working away on some electrics on the HO layout, Peter and I have been busy down near the ravine and Bus Driver Paul has been busy working on the gravel pit.

So now that the track exiting the fiddle yard is in and all the point-work settled down and not causing problems, Dave and I put the original mountains back in place and adjusted the tunnel portals to suit the new trackage. Over time we will fit it in properly, but for now a little at a time will do. Here is a photo of each side of the hills.


For a while now Peter has been slowly carving his mountains down at the ravine and to the right of it as the track splits and either goes around the mountain or up the helix. Now Pete hasn't spilt his ice cream on the mountain here, he has just painted on his No More Gaps and Paint mix.


Here are some more shots after it has dried and firmed into a nice coloured base for the mountain faces.


Oh and the molded mountains on the left of the ravine are now in place and Peter will soon start to colour them up.


Bus Driver has been busy and is building a nice quarry at the end of the middle peninsula. Here is a photo of his progress so far.


And here is some of the work I've been doing. Since the top deck has been dropped a tad, the left hand corner of the ravine area was a little tight. So I have scalloped out some of the mountain that exists between the inner and outer mainline tracks. This will allow us to see into the small yard a bit better.


I expect we will make an almost vertical mountain face at the end of the small yard in due course - I have only so far gotten a slab of foam loosely balanced in place so far.


So till next time - happy trains.