Monday, April 26, 2021

Don't Say I'm Not Nice to Others

Well, a so called mate got himself an Auscision HO scale AN class locomotive the other day and wanted me to put sound in it for him.  I eventually caved in as he's the type that if he touches something - kaboom!  

I made him test the loco itself under DC before he handed it to me, which he did - all the lights and the motor worked fine. So here is what I had to work with after he'd removed the DC board.


So I got him to order in an ESU v5 21 pin LokSound Decoder and one of those dual speaker kits, the ESU 50340 set which comes with two Sugar Cube Speakers and 3 different sized build-up sound baffles.


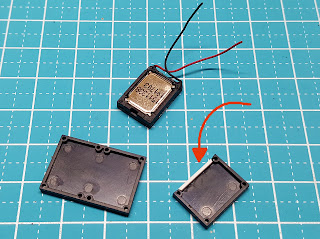
I then tried the 3 different sized baffle sets for fit and settled on the larger of the dual rectangular ones.  Here's a photo of the a 2mm and the 3mm spacer with the bottom and top pieces. So it gave an overall height for the baffle set of 11mm and 20 x 40mm cross section.


The next few shots show the build of the speaker setup.  I glued each layer of the baffle with normal Revell Liquid Plastic Cement and then used Aquadhere to glue the actual Sugar Cube Speakers into the baffle set. The white glue of course takes a number of hours to dry, so I used some wooden pegs (suitably modified) to hold the speakers in overnight.


The ESU LokSound decoder is a 21 pin version and it just plugged in without any wiring at all - saweeeeet.


Next I screwed the sound baffle set into the loco where one of the baffles supplied with the loco used to live - these were not suitable for use with these ESU Speakers or Baffle Set. The speakers are at the right hand end of the loco and an original baffle supplied with the loco remains unused at the left hand end of the loco.

The shell for the loco was then put on and fitted well - just fitted in fact!.  Then it was onto the ESU Programmer and the sound file pushed to the loco.  I used the ESU "S0531-LS5H0DCC-Diesel-EMD-16-710G3A-T-V4-R4" sound file from their website after my mate tracked down that the AN class had an EMD 16 cylinder 710G3A donk in them.


A test run of the loco and relative adjustments to sound volumes, momentum settings and basic runnings adjustments were then made using JMRI since I prefer that application for those sorts of adjustments. The loco was then packed up and I emailed the SOAB mate of mine that he'd have the loco on Wednesday at the club :-)


Tuesday, April 20, 2021

Socialism for PA's

Nope, not politics and also not about Personal Assistants - it's about some of my ALCO PA-1 and PB-1 locomotives.

Wayyyy back I put sound in some of my PA's.  I use the MRC first generation sound decoders as there wasn't much else around.  They did the job, but were fairly quiet, so I got a few decoders and only put them in my EMD F7 locos and a couple of my PA's.  As you can see in the previous post, I have found that the Sugar Cube speakers make a damned big difference to the volume of sound and all is new again and BETTER.

So I am spreading the joy around and distributing the sound decoders amongst the F3's and other PA's as well.  So the F7's had 2 sound decoders amongst the 4 loco consist and now only has 1 as that is enough to make it heard across the room nicely.  The second sound decoder got whacked across into my 4 loco consist of F3's.  Both sets are now top notch in the volume and sound department :-)

So the PA's got some attention today and I moved decoders around so that all consists have sound. The Southern Pacific PA/PB/PA set had 2 sound decoders and now only needs one, with the spare going to the D&RGW PA/PB set which previously had no sound before. Here are the leaders of both consists:

Now today I did not do the Sugar Cube installs, just moved the decoders around and lubricated the locos ready for the upcoming train show in two weeks time.  So What was maybe in a PA is now in a PB and some shells got swapped to make it easier.  It was all a big shell game and hide and seek I can tell you.  In the end I now have sound across the consists of F3's F7's and PA's.

A before shot of the lead PA and the PB before I mucked with them.


So for this PA/PB pair, I just left the decoders in place as the locomotive's mechanism is the same for both, and just moved the shell across between the two.  The front bogie had to also move as the lead loco does not have a coupler on the bogie and of course the B unit does.


The headlight had to also move as the PB doesn't have a light and the PA needs one.  Easy to do with the soldering iron to move the LED from one decoder to the next.


So after the game of whack-a-mole, hide and seek and such, we had the 3 PA/PB unit in Southern Pacific colours done.  The sugar cubes can come another day, but at least no moving of decoders will be needed.


Now for the D&RGW pair of PA/PB's.  I was able to make it so that the sound decoder went in the PA for now.  When I do the Sugar Cube install I will prbably machine off 4-5 mm of metal where the little speaker currently is.


So as of today we have distributed the wealth of sound amongst a bunch of locomotives.


Monday, April 5, 2021

Old Made Like New

So a couple of weeks back the RMCQ went up to Bundaberg to run trains at the Bundaberg Model Train Show and what a great time we had, as usual.

I had decided that this year I wouldn't run freight trains, but would run some of my passenger sets. One of course being the Atchison, Topeka and Santa Fe Railway's "Super Chief".  I ran the 8 car set and then added the 4 extra sleeper cars to it.  Motive power was of course the AT&SF liveried EMD F7A and F7B combo of 4 power units.  They ran well for the weekend, but the sound in them was very weak.  Here is half of the motive power set - the lead A and B units.

Of the 4 motive power units, 2 have sound decoders and 2 have plain decoders - so the train has some real horse power and never has a hauling issue.  I've had sound in them for yonks and it is first generation MRC sound - MRC 1658 decoders in fact. I have thought about it and decided the other day to see what I could do for the sound. In the shot below you can see the sound decoder in the A unit has a small coil speaker stuck on the circuit board and the B unit has no sound and I have also removed the front LED from the B unit as it doesn't need a headlight. The decoder in the B is a Digitrax DN163K0b.


Using JMRI Decoder Pro software, I could see that the sound volume was at maximum, yet sounded absolutely small. The speakers just weren't up to it. So I thought I might be up for re-doing the decoders and maybe using ESU LokSound or something - cost would be ouch. What the heck, let's just try putting in a Sugar Cube Speaker if it would fit and see if that helps first.  I had one kicking around and some baffle parts left over from the last job, so I had a whirl at it.

So the first step was to do some measurements and yep, there was room for a small Sugar Cube Speaker up the front of the B unit - NOT in the A unit. Hmmmm.  OK, let's swap the decoders around and put the sound in the B unit and the non-sound decoder in the A unit.

Let's start with the speaker.  So I had a left over ESU 11 x 15mm sugar cube speaker and some baffle bits.  I cut the base plate at the bottom left of the shot in two.  Then glued a strip of styrene along the edge to give 4 sides - the red arrow points to the styrene strip.


Next I glued the speaker to the baffle with Aquadhere and left it to dry overnight. I know it's not a big baffle, but the space in the loco is not big like in an HO scale loco it will have to do, as I dont want to mill the mechanism for more space.


The next phase was to remove the decoders from the two locomotives. The B unit has been soldered in place to make sure of good conductivity, so I had to unsolder the motor contacts.  The first one is next to the red arrow in the below photo.

Normally you will not see the motor contacts soldered down, but I have found , and read, that it is good practice to make sure conductivity is 100%.  Now in the A unit, I found it wasn't needed, so it still had the plastic wedge clip in place. Again a red arrow to mark it in the below shot.


So the plastic clip was removed from the A unit, the motor contact tabs bent back


 and the decoders were ready for removal.


Below we can see the top of the MRC Sound Decoder and the Digitrax Non-Sound Decoder.


And the bottom of each for a complete look.


Next step was to relocate the headlight. So I unsoldered the LED from the sound decoder and put it on the non-sound decoder.  A quick test under JMRI and the headlight worked fine.


Then I unsoldered the original speaker wires and removed the speaker - it has a double sided type tape holding it on the circuitboard, which came off pretty easily.


So now the non-sound decoder was placed into the A unit and the motor tabs soldered down.  Another quick test under the JMRI program and all worked as expected.


So the shell was now ready to go back on again.


Now my attention was with the B unit locomotive and get the sound into her. Some longer wires on my SugarCube Speaker and I was ready.


The speaker was now soldered to the decoder board and I got out my go to double sided tape and cut a small piece


So the left hand side of the photo is the front of the B unit loco. The speaker just fits in and has two parts of nothing as spare headroom when the loco shell goes on - perfect.


A quick test with the Decoder Pro software of JMRI and the shell was back on again.  The A and B units of one of the EMD F7 sets was now ready to rock & roll. 


Full testing was then done and holey moley! The sound is fantatstic compared to before - wow!  I think the second sound decoder can go to another train as it wont be needed in this 4 power unit loco set now - one sound chip will do nicely :-)

Now, you can listen to the old sound here:  Old Coil Speaker

And listen to the new sound here:  New Sugar Cube Speaker

Both are recorded at the same level, so adjust your speaker so you can hear the old one OK, then dont touch the setting and listen to the new speaker setup on my loco - impressive, hey  :-)