Sunday, December 2, 2018

Baby Powder

Look, there are many makers of weathering powders and similar type products.

Tamiya, Humbrol, Peco, Monroe Models, Aim Weathering Products, Bragdon Enterprises are just a few of the many makers of the modelling versions of these powders.  Over the years I have acquired a few different ones when the price was right.


A while back Peter A in the club came out of the closet cupboard and once he'd put down the model scenery items in his hands, he proceeded to tell me about an alternative that works well and can be a lot cheaper.  So he and I now use this new type of product - It's called Eye Shadow, and is quite fetching.  It sticks better than blush or other products so works for us.

Now, some apply there powders after painting a model and others just before they put a clear coat on over the top.  It all depends how much handling your model will get as to which way to go.  I prefer the powders after all the painting is done, as it shows up much better.

We found the BYS brand of cosmetics, which you can find at the cheap cosmetic stores around the place like Cosmetics Plus at Chermside, Strathpine, Carindale, North Lakes etc (look 'em up, as they do have a website) to be a good range of product.

Anyway, getting back to modelling, the model train variety.  Normally you'd say this girlie stuff is all sparkly and shiny - but's it's not.  We found that there are matte versions.  Matte makes it usable for us as it's not shiny - obvious hey.

Anyway, they are available in simple small compacts with a number of similar colours in each. We've found the 5 colour compact which is about 5 bucks and comes in two series of colour, "Desert Safari" and "Deep Space", is pretty neat as you get 10 colours for 10 bucks and that should cover most things you want to weather.  They also have 8 colour compacts in matte called "Camo Couture" and "Palette Neutrals".  These at 7 bucks are very good value as well.


Then there is the big gun, the big 12 colour unit - with a mirror !  This one is just called "matte" and at 15 bucks covers pretty much all your colours in one handy compact that will fit into your purse, I mean modelling box, very easily.


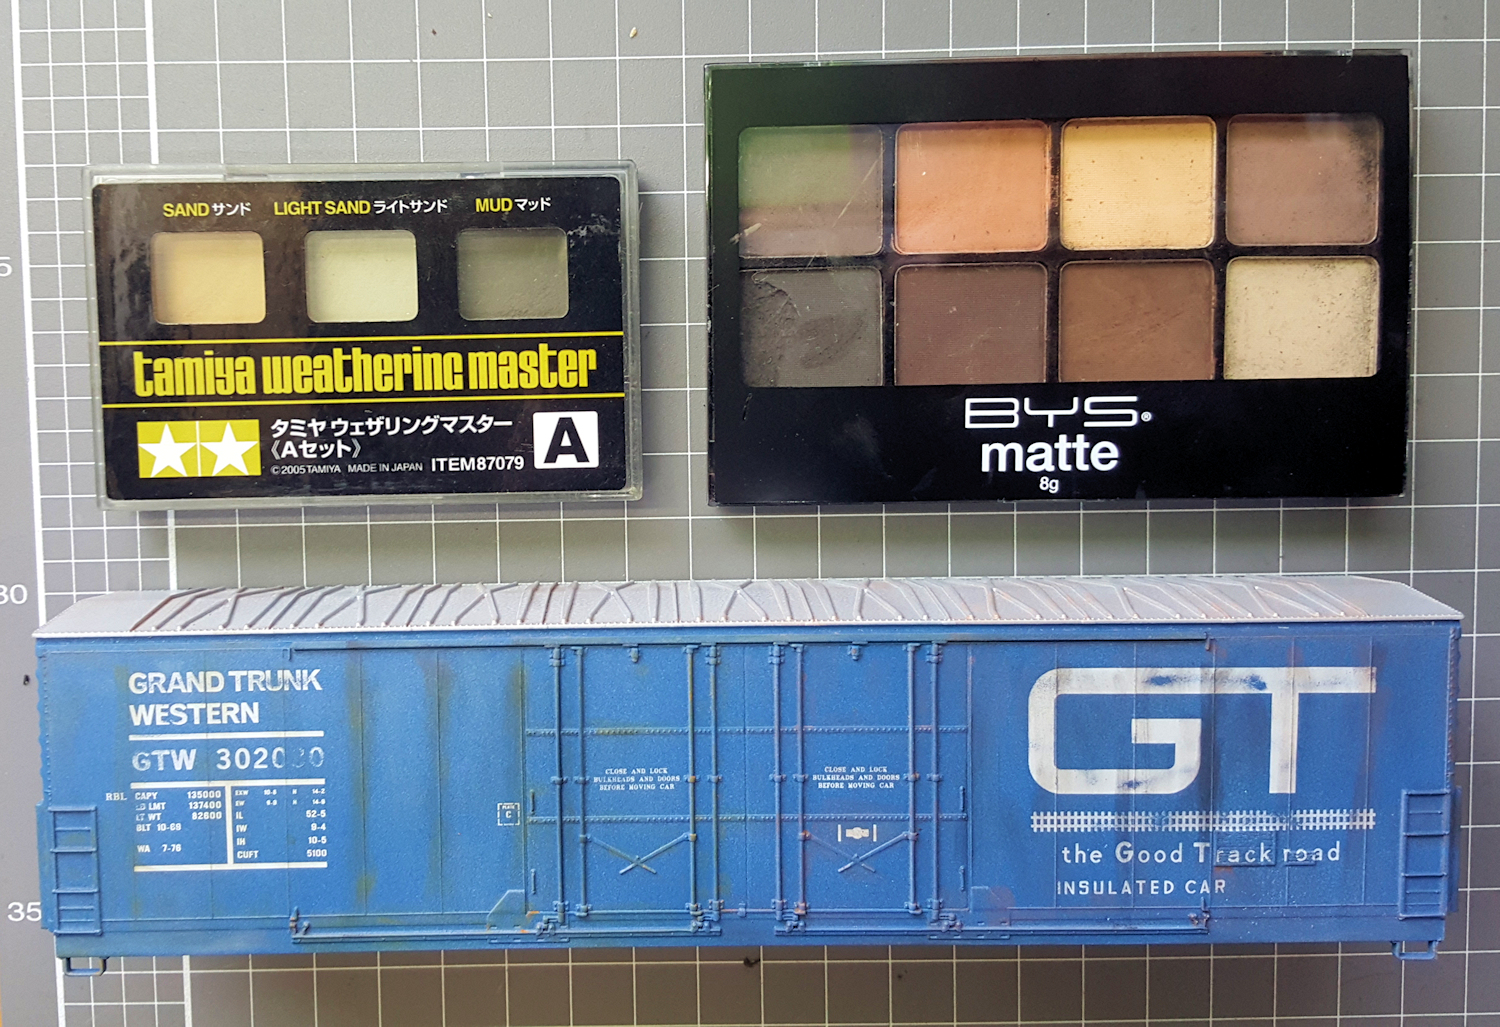
So just for show, I grabbed an old HO scale boxcar shell I'd been practising sand blasting and clear coating on.  On the left-hand side I have quickly used some Tamiya Weathering Powders and on the right-hand side I have used the BYS matte colours from some of the compacts.


So, there are alternatives to expensive modelling powders.  Now, here is a handy hint:  When you go into one of these shops, make sure there are a pile of other people in there, otherwise a single old fella hanging around looking at makeup, tends to get the young things behind the counter a tad worried!  And DO NOT bother to tell them what it is for. Just let them assume you are weird, as it is much simpler... believe me I know.  If you try to sound normal by saying it is for your toy model trains, then, listen to yourself... and run, run Forest, run!

Stay tuned as next week we will do a trial of Hair Removal Products, but we are still trying to get some brave souls to step forward and be out test subjects...

Sunday, November 25, 2018

I'm a Sucker for a Good Deal

So at out RMCQ Buy & Sell in May I got conned, yes I got conned by Col !  He saw me coming and I was an easy mark to sell some O scale coal wagons to.  O scale you say - yep, O scale. Not one, not two, but three wagons he managed eventually to get me to buy.  I am hoping to use them in a diorama because I can, OK ?!  We wont talk about those couple of Z scale wagons I accidentally bought a few years back either...

So now that my large workbench table is clear and ready for modelling I decided to do some modelling today.  The wagons are Atlas AAR 70 ton 3-Bay Open Hoppers in my favourite road - Burlington Northern.  But of course they have the old style oversized couplers and over flanged wheels and are 3 rail types.  So I had already gotten two pair of Kadee 745 scale couplers and two sets of finer scale wheels.  This should be enough, maybe, for the diorama. Anyway, it is what I had to play with today.  So after morning tea it was "To the workbench!".

Here we see the original couplers - a tad too big.


So when we flip the wagon over we can see the third rail pickup button on the left and the large flanges I don't like. 


So it was out with the small bogie screw and we see the bogie on the right and my replacement parts on the left.


Two more little screws and the plate that holds the pickup, coupler and bogie side frames together, comes off.


Now to get the axles out, the side frames have to come off. For the frames to come off, the springs need to come out.  So VERY carefully I was able to get my grippy tweezers in and grab the blighters without hearing the dreaded "ping" sound.  Got to admit, it is much easier to work on O scale than my normal N scale !


So now the bogie is apart and the axles can be swapped out.


You can see the difference here in the size of the flanges of my new wheels on the right and the old ones on the left.


So popping in the new axles and then placing the frames back on and then popping the springs back in, the bogies hold together.  Here is an old bogie setup on the left and the one with new wheels on the right.


Now for the couplers. Here is the old structure up top and my replacement Kadee 745 coupler parts across the bottom.


Again, I took lots of care so that I didn't hear that "ping" when inserting the springs.


Here is the place on the wagon for the coupler to go - to the right of the bogie pivot. The two little holes are already there on the model and makes it easier, as that rectangular plate is metal.


A couple of M2*8 self tappers and the coupler is in place - happy days.


Now the bogie can be completed and put back into place.  For this, the old coupler arm part of the clamp needs to go, as it hits the new Kadee coupler.  Since I will not be needing a bogie mount for the coupler, I can cut this bit off.  That's the right hand side bit.  AND, the structure is all metal, so it was out with the Dremel and a cutoff disk.


I screwed the clamp back on and the bogie became nice and strong with now had no excess flex - perfect.


So here is the old wagon wheels and couplers, followed by a new one on the left and old on the right, then a pair of new ones - much nicer I think.


Much better I think, much better.  Will look nicer on the eventual diorama.  If I am going to build the diorama with hand laid track and such, I had to have the wagons looking good - didn't I?

Tuesday, November 20, 2018

My Old Man's a Dustman - Part II

Anyway, enough about the table in Part I, neat though it is.  Anyway, I had another job in mind when I started all that.  The table has been stacked high with all sorts of crap and hasn't been able to be used as my main modelling table for absolutely yonks.  I'd like to be able to start a project and walk away from it for a few days and not have to pack it up between sessions.  But there is also a problem in that there is a window on that wall allowing people to see in, but this is no real problem as if they want to look at an old wrinkly bloke building model trains starkers, that's their mental health problem !


More importantly, the sunlight comes in that window and will fade things and irk me for all sort of reasons, not least beaming into my delicate eyeballs.  Currently a very old bedsheet is nailed across the window, but that's not a good permanent solution.  So, I went to Bunnings and grabbed a couple of sheets of white 4 mm thick Translucent Tunnelcore panels - you know, like Corflute.  


So I've cut it to fit the inside of one of the sliding glass window panes and the other piece to fit between the outside security screen and the other window pane.  Trust me, I know what I'm doing !

Now, as a side thingie, I found that when trimming the sheets across the grain, any thin slicings do very much look like ladders.  Might be useful on a layout.  I'll need to investigate what sizes the sheets coming as to thickness and such.  I can feel a small project coming on.


So I put in the first sheet and checked inside and outside to see what it looks like and bonza mate.


I then trimmed and fitted the second sheet and it sits nicely now and wont flip out or move around.  No one can see in or out and the sunlight is kept at bay - so now my mate Dracula can come and visit during the day and we can both sit around in our birthday suits and no ones sensibilities will be offended.  An added bonus is that to do all this I had to clean the bloody area up and I can now do some more modelling without having to spend ages cleaning up first and then putting all the crap back afterwards :-)

So now to get ready to model... but first another cuppa and then maybe a snooze.  Then a read of some magazines and books, then dinner and then off to the Buy & Sell at the Union Pacific Model Railroad Club.  CYA.


My Old Man's a Dustman - Part I

Did you know, my old man's a dustman?  Nah he's not, as he was a fitter and turner by trade, but the song sung by that Scottish fella Lonnie Donegan by that name, was funny as heck.  Anyway, I digress.  It is dusty as hell in my garage under my supposed large work table.  My old man made some special hardware for that table of mine.


I built the table myself from chipboard for the top and it sits on 3" x 1½" pine timber for the frame.  This is all then screwed onto some folding legs.  All pretty normal you say, and yes that bit is.  Now to make more room in the garage, I asked the old fella many moons back, to see what could be done.  Quick as a flash he said I could lean it up against the wall.  I of course answered him back... Stupid I know, Yeh, that's easy, but it could fall... says I.  And he said back, as if I was stupid, nah you git, we hinge it.  Then he mumbled and walked away to do something.

So he eventually welded up a pair of hinges for me with removable pins - nice and large so a dope like me couldn't loose them.  


The white part is dyna-bolted to the brick wall and the silvery part is screwed to the table.  There are two sets, one at each end of the table.


So the table when in use, sits on the ground and can be moved about.  But most of the time I have it down, but pushed against the wall with the hinge pins in place.  When more space is needed, I just lift it up against the wall and clip it back with a wingnut and bolt that is strategically located on the wall high up and out of the way.


Fantastic table.. when its not fully cluttered up.  So I decluttered it today and got rid of that old torn and dirty bed sheet over the window.

See part II to see what happens.


Sunday, November 18, 2018

Not Railway Related, but Relevant

My weekly coffee with an old friend of mine got me going.  Grant was talking about making up some nice proper note books  - the sort with leather binding and such.  As soon as he said the word "clamp" a light came on and something in the back of my mind came together.

Every time I get a new magazine out of the mailbox or open up a new parcel from a shop I end up with more - more scrap paper.  They all come with a packing list or a postal address printed out on paper - about an A4 sized piece of paper.  So I've been "waste not want not" and folding them in quarters and cutting them up with a large carving knife.


The back of the bits of paper are clean - no printing.


So they make for great note paper and I sit them on the kitchen bench top and grab them for writing shopping lists, notes and all sort of things.  I also have a bunch on my modelling bench for notes and figuring and such.  Basically - they have cost me nothing.


What the light going on at coffee about the word "clamp" is that this is needed when making notepads - my style of notepads.  So with the above bunch of bits of paper which was all higgledy piggledy I went to the workshop area, sat down and then tapped the bunch of papers down on the bench so as to line them all up on the top edge.  This of course make one edge all over the place, but who cares.


But one edge gets to be all lined up and tidy.


So a couple of bits of wood, in this case my paint stirrers and a pair of clamps were gotten out.


I carefully placed the wood either side of the bunch of paper, leave about 1-2 mm of paper sticking out.  I then tightly clamped it all together.


Once clamped, I got out my bottle of white glue, Selleys Aquadhere, and a small paint brush and thickly painted this all lined up edge of paper.  I slopped it on well and proper.


I then sat the whole ting upright so the glue wouldn't drip and left it overnight for it to dry properly.


So I went down this morning and took the clamps off and I now have a nice notepad that wont blow around in the breeze.  


Just like a bought one it is and it only cost be a few cents worth of glue!


So now when I make my scribbled notes about trains and groceries, the paper will not be found on the floor or all over the place - it will come from my nice sort of neat notepad blocks.

Sunday, November 11, 2018

Hot Under the Collar

As Saturday was the monthly club meeting, I wasn't going to bother with too much dirty work on the layout.  So I just brought down some of my HO scale Logging Locomotives and Wagons for a checkout.

So I stripped down my Bachmann 3 Truck Climax, as Peter A was about to order some spares for his two truck version and we may as well share freight for a small order of parts, if I needed any.  


I could have sworn my loco already had metal gears, but it turned out it still has plastic bevel gears in all three trucks. So I politely said to myself, "Dang".  AND, one had already split.  These are really tiny bevel gears that press fit onto a small spline shaft.


Here is the rear truck, or bogie, being stripped down to get at the above gears.  I am dreading having to push new metal gears back on when they arrive, as the plastic ones are easier, but still a real bugger to get on.  I'll probably learn some new swear words I reckon.


Well I thought - I'm a smart fellow, I'll just disconnect the rear truck and use the good gears in it to fix the broken truck in the middle.  After doing this, and putting the loco all back together again and feeling pretty smug about it, I put the loco on the test track... Nothing.  Zip, nada, no go.

It turns out the decoder for controlling the loco is in the last truck - so another little naughty word or three was uttered "dag nab it".

So I went and advised Peter of my requirements and then put all the "bits" into a little plastic baggie and put it away.

Luckily I had also brought down my Rivarossi 3 Truck Heisler loco.  So onto the layout it went with 4 logging wagons and a couple of laps of the club layouts' top deck was made - took absolutely ages!  Even at half throttle, it was crawling... beautifully slow she was.  And down at about 15 percent throttle she barely moves - wonderful - love it - fantastic  :-)