Wednesday, February 11, 2015

Oh, and Arthur - It's Your Fault!

Now before I get to Arthur, of the Tuesday Night group I attend, I'll detail the first part of today.

Of course I headed down to the club and got straight into it with the foam tools and the beady eyed foam. I huge mess ensued and lots of fun as I carved it up. A lot of progress on the rolling hills was made, but more is still required. But the fellas at the meeting on Saturday will be able to get a good idea of rolling hills.


And now to Arthur. The Tuesday Night group meet last week on Tuesday at Arthur's place. As always a great time was had. There were a couple of the new Wuiske QR 1550's charging around on the 12 mm track and looking good while doing it. They are very tempting indeed. Here are a few short videos of the QR's:


But also on the layout was an Auscision NSW 73 class from a little while back, a few of the latest TrainOrama NSW 48's. Here is a quick video of the 48:


And the most recent - the NSW 45 class loco from Auscision. Yes here is a video of the 45:


Scooter had his 45 there as he'd gotten his better half to collect it at the PO that arvo - he went for one of the ones in Marlboro livery as had Darren. Now I said earlier it's Arthur's fault, and yes it is. His layout looks so good with these locos running around with great sets of wagons behind them, that a fella just cannot, I say cannot, resist!

So lunchtime Wednesday (the day after the Tuesday Nighters meeting) I rang Auscision and ordered one! I got the running number of 4509 which is Indian Red (1970's) with single marker lights and buffers. The post man delivered it yesterday, so here is my new baby. I did a bit of running in on DC at the club on my new rolling road too - neat gadget. She runs nice and quiet under DC and crawls along as well when required.


Now to decide on a decoder. I know it will need to be sound, but the question is do I go for the cheaper option and therefore the Tsunami TSU-AT1000 with the Alco 251C donk in it which therefore needs to be soldered in, or do I go for the ESU one that comes with a real 45 sound set (at a bit more money) but plugs straight into the 21 pin plug? Following a few threads in some blogs from those that know what they are doing, would suggest the Tsunami if I want to consist and do momentum with my other 47's and 49's that have Tsunami's in them. I suppose it coils down to how lazy I am.  We'll see.


Till next time, have fun.

Saturday, February 7, 2015

Staggering Vertical Wall

Peter A continued, with a bit of help, carving up the vertical wall that will be the main feature between the helix and the river crossing. Spectacular is all I can say. This will be a really great scene on the layout.


In the half dozen hours I spent at the club today I managed a few more slabs of foam for the farmland and rolling hills area and did some carving. There is one heck of a lot of carving yet to go, so the shots only show a bit. A lot of the foam needs to go to make it a nice flowing gentle hillside type area.


After a discussion with Peter A a bit of a trim was done on the right hand river hill top as it really wasn't a good continuous slope - now it is.


Barry P came down and lent us a hand and was able to get some plywood into the gaps on the small industrial side of the peninsula. This will allow us to add some foam in relevant areas and see what we can come up with to finish that side.

Thursday, February 5, 2015

1.1V B ledoM 2 iP yrrebpsaR

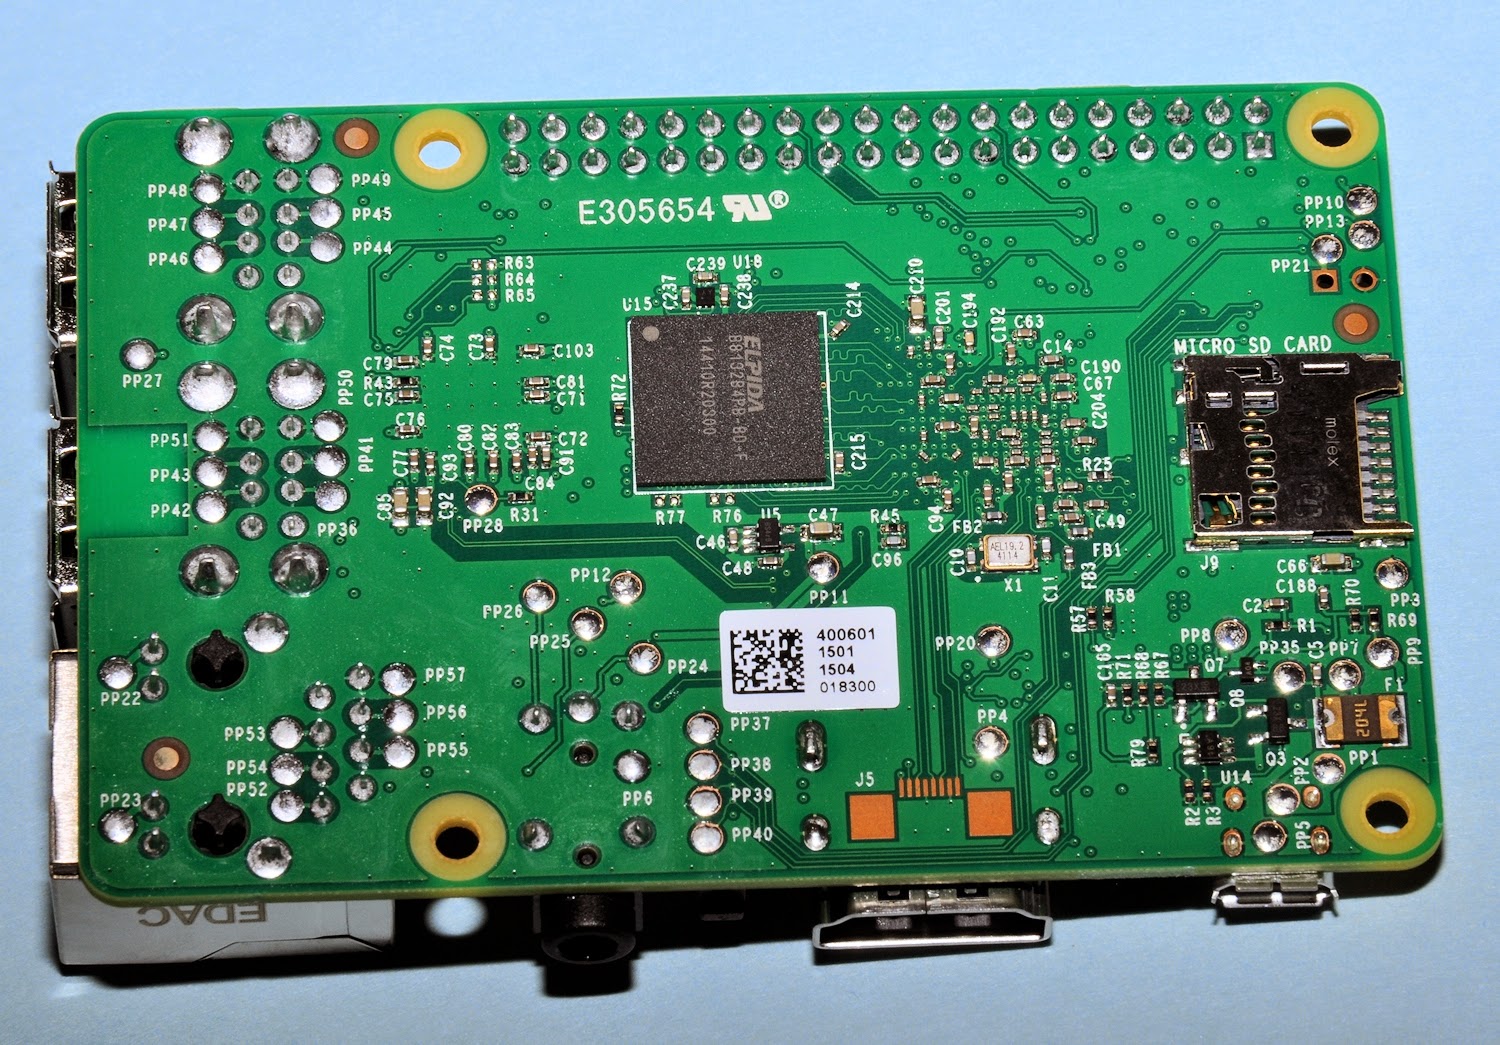
Woo hoo ! My new Raspberry Pi has arrived - the new Raspberry Pi 2 Model B. This is the new one announced only on Monday this week :o)


Greg B and myself spotted the news article printed on Monday and we so impressed, I tracked down a supplier - the every ready Element 14. But they didn't have any - no one did (insert sad face here).

But when I rechecked on Tuesday, they had supplies in so an order was quickly placed while stock was available as they are a VERY hot item. So we ordered a R-Pi 2 each plus a power supply each and a case each.


Got home and found a nice package waiting for me full of raspberries. So here are the details of the new beast garnered from the official website - www.raspberrypi.org/


The Raspberry Pi 2 Model B is the second generation Raspberry Pi. It replaced the original Raspberry Pi 1 Model B+ in February 2015. Compared to the Raspberry Pi 1 it has:

A 900MHz quad-core ARM Cortex-A7 CPU
1GB RAM
Like the (Pi 1) Model B+, it also has:

    4 USB ports
    40 GPIO pins
    Full HDMI port
    Ethernet port
    Combined 3.5mm audio jack and composite video
    Camera interface (CSI)
    Display interface (DSI)
    Micro SD card slot
    VideoCore IV 3D graphics core

Because it has an ARMv7 processor, it can run the full range of ARM GNU/Linux distributions, including Snappy Ubuntu Core, as well as Microsoft Windows 10 (see the blog for more information).

The Raspberry Pi 2 has an identical form factor to the previous (Pi 1) Model B+ and has complete compatibility with Raspberry Pi 1.


So I wont rush into playing just yet as I have other things on tonight, but it wont be long. I reckon with the extra oomph under the bonnet and the fact that Microsoft have announced they are releasing a FREE version of Windows 10 to run on this Pi, things will be very interesting indeed.

So for those that don't want to play Linux for their JMRI, you will be able to play Windows.

Wednesday, February 4, 2015

Blow the Foam off another one

I had a chat with Matthew F last Saturday and said I'd give him a hand with the foam work for the area he is going to work on - the section between the river and the base of the peninsula. So today I got out some sheets of blue expanded foam and made a start on some of the foam work for Matt. It involved getting out some drafting film and making templates as I went along of the curve of the track edges. From these templates I was then able to mark out the curves on the sheets of foam and hack into them with the handsaw. All up I was able to get 8 sections cut out and ready to glue down another day.


We will build up the foam until we have enough to shape into the hills needed to make the rolling hills along that section of the peninsula.

In between this I helped Kev M to connect up a second hand laptop to the layout as he prefers this to the Raspberry Pi. That reminds me, I must ask him since a laptop will drive the wireless if the N scalers can have the R-Pi, as we could sure make use of it.

Bruce H started adding in more blocks of foam along the top edge of the helix so we can shape it for scenery. Oh and the helix got sort of electrically connected up temporarily by the fellas and a test loco or two made their way up it from bottom to top and down again - progress!


I cleared out all the junk from down the end of the central peninsula so that the foam work can be continued down there. We'll drop in some basic land forms so as to give some scenery until Keith S gets some time to do some more work on his township. With the cleanup, the area at the back of the peninsula where some more small industries are going was also cleaned up and a small re-jig made. The Medusa Cement plant will probably move to the right of the original location since it uses a shed to cover the rail wagons during loading. This shed isn't high enough for double stacks and such so the move to the right will allow the passing loop to be used by all trains.


In the area where the cement plant was originally proposed for, along the skyboard, we plonked in a platform we had kicking around and it sorta fills the location nicely. So maybe we can put something like an open shelter type station on a short platform of perhaps two cars length along there. This would give a small additional stop for passenger trains and fill the empty spot. Being on a passing loop, the passenger trains wont cause problems to the high speed freights on the mainline.


I reckon something like a small milk shed and waiting shed would do the job on a short packed earth platform that has sleepers at the front to keep it from falling onto the tracks, would look the part of a nice regional small branchline stop.

Saturday, January 31, 2015

Saturday and the workers arrive for the morning shift.

Today Peter A started in on his mountain scene that will exist between two sets of portals which will frame the entry/exit to the helix from the lower deck level. This should end up being a really nice scene in my opinion. Peter is using the extruded polystyrene foam for the near vertical rock walls that will surround the scene. He will be using his newly acquired gouging method to make the rock faces in this particular type of foam as it takes the gouging so much better than the normal expanded polystyrene foam.


John B did some more foam work along the trackage that joins the area at the far left of the station up to the middle of the yard at the left of the station.


The other day after doing some timber work around the access hole at the base of the middle peninsula, Barry P started to glue in some fingers of 4 mm ply that will be used to hold up foam work between the top deck of the helix and the last turn of track beneath it. This foam will be shaped and sceniced to give some appeal to the helix besides it natural.... helixness. Since Barry wasn't there today I thought I'd help him out and get the last dozen glued in place. Later in the day I dummied up some foam to show what the starting point for the foam work will look like.


Above we see underneath the last loop of the helix at the top and the fingers of plywood glued on with Liquid Nails.


My main job today was to get the rail bridge back in place over the river so they could run trains in the afternoon - don't know why, as I was having plenty of fun building stuff on the layout!


Oh, you ask what the white think behind the rail bridge is. OK, I'll tell you.  It is a dummy I mocked up of a road bridge. It will be the main drag from the town on the left of the bridge and will disappear behind some trees at the right of the river, about where it meets the current top of the hill. From this main road a side road of class 3 of either dirt or perhaps very poorly maintained bitumen will venture across a wooden bridge to the front side of the mainlines and then head into the rural are at the right of the river. Craig M has volunteered to build the bridge for us.


Oh, and the last thing I did today was to start cutting a hole in the sky board to allow the wye to be laid once we get the points. Now to figure out how we will hide or scenic the entrance/exit in the sky board for the wye...


Till next time, have fun.

Friday, January 30, 2015

I Got Crook

Ok, so I wasn't too crook to not play trains. The tucker from my freezer last night should probably have been thrown out but... I can be cheap at times. So a few trips to a shiny white ceramic device and I was right to go. 

By that time I'd emailed the boss to say I wasn't coming in.

So a couple of cups of coffee and a slice of toast and I was ready to go... to the train club... I reckoned it was too late to call the boss - what a shame ;o)

No one else there today at the club, so it was on with the radio and switched to my favourite 4KQ and the volume turned up so I could hear it. Fresh cup of coffee and away I went. Foam beads would be a flying everywhere. But first I had to remove the railway bridge so as to access all the foam without damaging the bridge. 6 screws later and also the track joiners moved and out came the bridge. I better put it back before noon on Saturday so they can run trains I suppose!


I shaped both sides of the river with my Surform tools with a good vacuuming every ten minutes so that snow drifts didn't build up everywhere. Once I had the shape roughly the way I wanted on the hills, I got into the cuttings on either side of the mainline tracks. Craig M had advised me to keep the slope of the embankments to about 60 degrees. So I grabbed a bit of ply and spent 20 minutes making a nice wooden template to measure 30, 60 and 90 degrees. A bit of school geometry helped me here as I couldn't find any protractors at the club. So based on the long side (hypotenuse) being twice the length of the short side of the triangle (for one with a 60 degree, 30 degree and a 90 degree angle), I was able to cut a piece of ply that already had a right angle on it (90 degrees is a right angle as I remember) to suit the job. Some nikko markings of the angles of 30 and 60 degrees on both sides and a coat of clear paint and I put it aside for a while to dry.


While waiting for the template to dry I cut out a section of track on the reversing loop and got the area ready for the point to go in so we could progress the creation of a wye. It was fortuitous in that there was already a track join at about the right spot for the point. So a bit of cork was glued down and painted grey and then the tracks cut to length and all sharp edges filed away on the track and the set of points. I'll be able to glue the track down tomorrow I reckon and perhaps put the wiring in. The last point for the wye will be a while yet as we haven't purchased it yet.


The template was now dry enough to use and I continued on with the embankments. A pile of snow later and they were done. Next was to fill any and all holes in the foam from joins and where I hadn't added enough foam. I used my usual foam putty mix but this time with a twist - a twist of vermiculite. I had read that some people add vermiculite to their plaster mix to make it light. Well that's a good thing, so I thought I'd try it in lieu of using blended up foam beads in my mix. I also remember that vermiculite is also squash-able since it is sort of popped corn, well, it's popped and hence spongy and light. So I figured it might be able to formed better when used as my putty, as the beads do not compress - they stay round.


So the mix was a couple of tubes of No More Gaps and similar acrylic gap filling brands, and to this I added some acrylic cheap artists paint to make it all go brown like dirt in colour. I then added three or four handfuls of vermiculite and of course some foam beads. a tiny amount of water and I mixed it all up to a really think porridge consistency. This was then applied with a paint scrapper to all the holes and places needing some texture or adjustments. This included along the side of the track where the embankments meet the ground. This I was able to shape so as to look a bit like a drainage ditch along the side of the tracks.

Once I had applied about a liter or so of "putty", I made up a mix of just No More Gaps and coloured paint and a few drops of water. The consistency here is more runny, like wet toothpaste. This I painted on with a brush all over the foam and the filling I'd done. This will dry to the tough rubbery skin that will seal the foam.


It was now mid-afternoon, so time to cleanup and head home - I could hear a beer or three calling me, and boy was it a loud call!

Wednesday, January 28, 2015

It's all Greg's fault!

Before Christmas Greg B and I bought ourselves a little present - we got ourselves a logging loco each. There was a good price going on some Bachmann Spectrum HO scale 70-Ton Three-Truck Climax Locomotives. So we each ordered one. When they both arrived I buggered around with mine first and was having all sorts of problems running it in and testing it.

When talking to Greg a week later, he said he had no problem... yeh, right...  he had a nifty tool to help. He had gotten himself a "Rolling Road" from DCCconcepts. So after he brought it in for a show and tell at work the other week, I caved and ordered one myself. It arrived this arvo and was in use an hour later - neat!


These extra parts above, are so that I can use the Rolling Road with N scale locos, HO/OO, EM/P4 and also with HOn3½ and HOm.